Week 54

The roofers came back to relocate the club tiles and the whole tile hanging face is almost there. There are six rows above the club tiles and six rows below, but it still seems a little low, so I think they’ll be back. house 2017.04.26 week 54 - 1.jpg

And I haven’t taken a photo of the front door for a while, so just to remember what it looks like, here’s an image out of the winter shadow an in the sun now that spring is here.

house 2017.04.26 week 54 - 5.jpg

Other parts of the exterior of the building are coming along too. The nice weather helps to make the site look good, and the guys are doing a great job of keeping everything tidy. And when they’re in the middle of a job, most of the bits and pieces are kept together and out of other trades’ ways. It’s amusing to see little empires of woodwork, electrical bits, decorating, and piping in different rooms.

house 2017.04.26 week 54 - 8.jpg
artsy wheelbarrows
house 2017.04.26 week 54 - 9.jpg
electrical detritus in the front porch
house 2017.04.26 week 54 - 12.jpg
panels are coming on

The roofers finished the scalloping on the back windows. They’ve only got the garage flat roof and the club tiles to go.

house 2017.04.26 week 54 - 24.jpg
sunny scalloping on the back of the house

The garage door arrived–hooray! The installers were super jolly and put the thing up in a day. There was a massive design moment at the beginning of the project when we had to decide if to make the door high and bespoke as it is, or to make it a standard size with a brick soldier course on top. The higher door keeps the top in line with the tops of the windows along the face, but it was the expensive option, and I hope that you agree that it makes sense to spend the extra cash on the extra height.

house 2017.04.26 week 54 - 25.jpg
door arrival
house 2017.04.26 week 54 - 6.jpg
door installed

The plumbing team has been quietly getting on with the boiler and fittings all without any fuss whatsoever. It’s funny to come to site, say good morning to Sid who’s mostly been doing this final bit, and for him to get right down to business with a fast-paced “Now, where do you want this exterior tap?” These guys don’t hang around! But you can see that the services are all ready to go in a happy configuration of geometry.

house 2017.04.26 week 54 - 7.jpg
boiler arrangement
house 2017.04.26 week 54 - 15.jpg
tap located on the garage wall

The Sparks have been working hard on the trunking while the other trades are busy in other rooms. They’d rather be cutting out holes for LED down-lights, but this needs doing as well, so now the cables are set in trunking within the coats cupboard. How we finish this area is up for grabs as it’s not plastered. But trunking and plaster don’t usually mix and the whole wall will be painted to seal in the dust, then boxed in to finish it off.

house 2017.04.26 week 54 - 21.jpg
trunking

The kitchen arrived at the appointed hour without fanfare; just a couple of guys who quietly discovered that there was no trolley packed in with the kitchen units. The only solution was to carry each unit by hand, so Artur simply slung them on his back and carried them in. It turned out that he was in charge of fitting the units and most of the appliances as well in the coming week.

house 2017.04.26 week 54 - 13.jpg
that’s the kitchen in there
house 2017.04.26 week 54 - 14.jpg
bit of rubble doesn’t get in the way
house 2017.04.26 week 54 - 10.jpg
before the kitchen arrives
house 2017.04.26 week 54 - 16.jpg
the contents of the truck land in the kitchen space
house 2017.04.26 week 54 - 26.jpg
appliances and more kitchen units

Eventually Artur fitted the whole thing single-handedly. I’ve never had a kitchen this nice and it’s a real luxury. Or hopefully it will be if we made the right decisions. I said to Dave onsite this week that when asked if I was excited about all this recent action that a very large part of me doesn’t want to look at it while it’s being installed in case I change my mind or don’t like some part of the design. But the other part of me is jumping up and down inside and really excited about running the family from this little area.

Some bits like the humungous drawers make it feel really usable and very real. I recall Auntie Eileen saying she really hoped that I’d make a good go of the kitchen when we finally got round to doing the house. That was a very kind thought and I hope she would approve of this incarnation.

house 2017.04.26 week 54 - 2.jpg
magic drawers
house 2017.04.26 week 54 - 3.jpg
three days of work and it’s almost all in — amazing

We knew that the overhang on the peninsula was going to be tight with regard to the big dining table in the room, but it’s only now that the units are in that we can line up a mock table to get a feel for the size. One of the things yet to do is site the pendant and LED spots over it. This isn’t easy and requires a fair degree of commitment on table location. We haven’t quite decided where the lights should be, but one thing is for sure: the overhang and the table together don’t provide enough space to get around comfortably, so the overhang will have to go. That means my two bar stools will go too.

house 2017.04.26 week 54 - 4.jpg
burlap mock table

Part of the ironmongery order arrived last week and was installed while we were away. It’s nice to go around and be surprised by the existence of doors. Sometimes it’s the boundaries that make the space feel like well-defined areas. One nice touch was a set of parliament hinges on the family room doubles.

house 2017.04.26 week 54 - 11.jpg
that’a nice hinge

The shower trays went in while we were away too. We wanted the master ensuite tray to be 100 mm bigger than the well was built for, and this was always going to be a problem with the underfloor heating. The idea was to chip out enough of the concrete floor to accommodate the tray while avoiding puncturing the heating tubing set in the concrete. This was a tricky job that James wasn’t too keen on doing. I wouldn’t be keen on it either; I recall the words “catastrophic” and “potential” and “failure” being used in discussions about this bit. But it was done, and done very well as usual, and the trays are all in sitting in their seals of silicon.

house 2017.04.26 week 54 - 22.jpg
shower tray

The decorators started with the Marble White in the bedrooms, and the skirting went in.

house 2017.04.26 week 54 - 23.jpg
white on white in Bed 05

The stairs arrived as well.

house 2017.04.26 week 54 - 17.jpg
newells
house 2017.04.26 week 54 - 18.jpg
bottom treads
house 2017.04.26 week 54 - 19.jpg
CNC’d area to fit treads…
house 2017.04.26 week 54 - 20.jpg
… and the bit that fits into it

Lots of decisions behind the scenes, and we’re not keeping up with the pace. The pressure is on and everyone can see the horizon now!
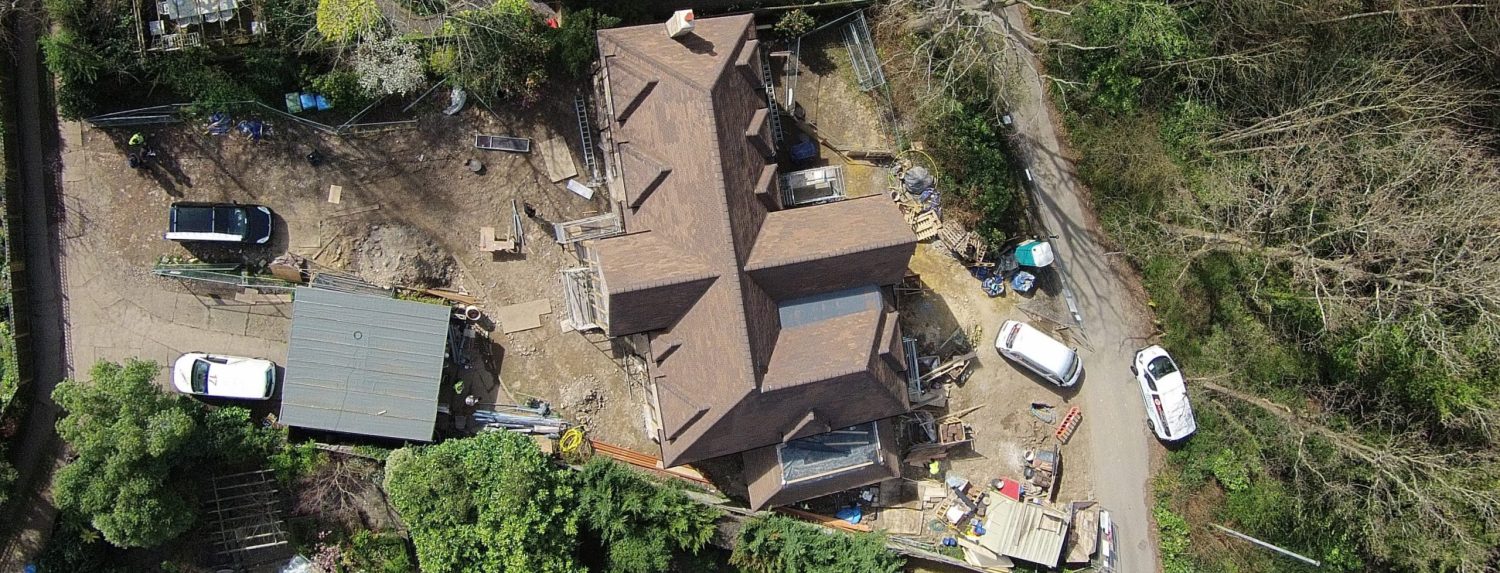

Week 51

Ben had the drone out and it’s great to finally see the roof in its glory. Here’s a visual progress report from the get go.

And these….

DJI00165 - Copy.JPG

DCIM100MEDIA

Tony had the fire on early in the week, so he kindly invited Ben and me to have a look at making balusters. Each of these is completely hand made by drawing out the bar to a point, then curling it very carefully to match the test piece precisely. Incredible work and much labour involved. Tony has Dave in to do the hammering and finishing, and anyone with eyes can see that their years of working together on projects like this make it seem so easy, but in fact it’s a lot of unspoken expertise involved to make each baluster. There are a lucky-13 curlicues that are framed by straight ones going either up or down. Should be amazing to see when it’s done.

The joinery company making the stairs have been brilliant in supplying Tony with scale drawings of each piece. Colin has travelled from Andover to Betchworth (more than once!) to deliver the drawings and talk about the work with Tony so that the joined up staircase between the two completely disparate trades are installed seamlessly at the end of April. Can’t wait!

house 2017.04.02-1.jpg
Tony and Dave working to draw the bar into a point

house 2017.04.02-4.jpg
checking the curve by eye
house 2017.04.02-13.jpg
bending vice

house 2017.04.02-15.jpg
forest of balusters
house 2017.04.02 - 13.jpg
a proper working forge
house 2017.04.02 - 14.jpg
sorry, can’t stop taking photos of these

Meanwhile onsite, the wood floor arrived. Usually, they hoist the planks up box by box, but the ceilings are a little high for that here, so they were hoisted up two planks at a time–it took a while.

First the guys prime the floor, then they lay a layer of latex which acts as a barrier between the concrete floor and the wood. They mix this bucket by bucket onsite. Then a really thin membrane of foam is cut to shape, and finally the floor is put on top.

house 2017.04.02a - 1 (1).jpg

house 2017.04.02 - 7.jpg
the wood arrived, hooray!
house 2017.04.02 - 8.jpg
primer coat
house 2017.04.02 - 1.jpg
latex milk
house 2017.04.02 - 11.jpg
mixing gear
house 2017.04.02 - 2.jpg
pouring latex on a primed section of floor
house 2017.04.02 - 3.jpg
spreading around by hand
house 2017.04.02 - 6.jpg
Gillian’s room with the finished floor

The services are being installed gradually. We’re waiting on the water board to come and inspect its trench, so although James doesn’t like leaving it open for health-and-safety, it has to be left until they drop round. The boiler should arrive soon; the flooring guys need it so some heat can get into the floor to dry it out. So we were very pleased to see the gas company arrive and install the meter in the hedgehog box around the side of the house. After the drama of last week’s engineer unable to install, this took a grand total of 10 minutes and the guy was off. And the three-phase upgrade for the electrics will be in the middle of April.

house 2017.04.02 - 4.jpg
not a hedgehog
house 2017.04.02 - 17.jpg
ready for electrics

The Sparks are in cutting holes in the ceiling. There is so much to this electricity piece, and we haven’t even chosen any fancy fittings yet. Here’s a challenge for you: next time you’re in a place with small LED ceiling lights, go ahead and have a look at the geometry of their placement. The glossy mags always say to hire a light designer because you yourself as a layperson could never hope to achieve a good effect: what you’re lighting, how you’re lighting, when you’re lighting, controls….. The Sparks want things in grids, as do the architects. We’ve opted for a DIY approach to tweaking Dave’s placements just a little in order to centralise some of the fittings around architectural features like doorways and cupboards. I’m no expert at this, and I hope that I will remember fondly this m.o. when I’m not too upset at the finished product but instead, basking in the glow of the thousands of pounds saved that I didn’t pay to the lighting designer. (Fingers crossed, obvs.)

The guys use their laser sights and chalk lines to get the rows straight. This doesn’t please the decorators who then have to wash off the chalk because the dye runs into the paint, especially if the paint is white. Like on a ceiling. Where the lights are. Duh.

house 2017.04.02 - 18.jpg
takes a day to set out
house 2017.04.02 - 5.jpg
and another couple to drill

The non-herringbone panels on the side of the house are coming together. I had a total 4 am brain-fade about the side panels which are not at 90 degrees, but rather are offset and parallel to each other. I texted James about it suspecting they’d have to rip off the half-laid panel, but he replied with a photo of the plans which clearly show the bricks in parallel. Glad someone’s on the case! And note to self: consult the plans before hitting the panic button.

house 2017.04.02 - 19.jpg
brick slips

But there are still a bunch of gaps in the design. The biggest one is the fireplace, and Steve came up from deepest Sussex again to speak with Dave and me about how to accomplish what we’re after for the surround. We’ve made it enormously complicated, and probably unfeasible from an engineering point of view. We’d like a floating stone mantle–but how to fix it? Lots of head scratching, and to be honest I’m about to give in to a simpler design. This room was never designed to live in, mostly to look at, and this is disappointing as we should have thought about it more from the start. The windows are too close to the fireplace wall to put units in, and the building regulations put so many restrictions on measuring out non-combustible zones that it’s all very tiresome. We’re at that last 20% that takes 80% of the effort. But it will be beautiful, the workmanship is great, and it’s only complicated because we the clients are trying to squeeze too much in. Much better to simplify, pare back and let the features in the room breathe a bit. Watch this space.

house 2017.04.02 - 9.jpg
blank wall, blank heads

Another bug-bear is the garage roof. The guys have done a brilliant job at getting the end to just kiss the fence, so the dimensions are perfect. But how to support it is another kettle of fish. The original (built, then unbuilt) brick pier was a thing of beauty, but it didn’t give us very much room to get around. So we’ve opted for an oak post on a smaller plinth instead. In the meantime, there is a slightly bendy Accro holding the roof up at the spot where Terry says holds the max load. But this still leaves us a little short on space to get around. Do we place the final post off the sweet spot either towards the building or away from it and add a stiffening bracket? Can we? Or do we suck it up and just stick a post in?

house 2017.04.02 - 10.jpg
jury is out on replacement to bendy Accro

Last week’s tile-hanging design query was bottomed out, but this ended up being just a case of making sure everyone was looking at the same revision. The flare at the bottom will be great, and the roofers will fit in the tile hanging when they next have a gap in their diary. It’s a stand alone piece, and not mission critical–which is refreshing!

house 2017.04.02 - 16.jpg
flare supports


Week 50

Spring is springing on the way to site.

_house 2017.03.26-1.jpg

_house 2017.03.26-19.jpg

While the weather improves and we’re thinking about trenches, services and meters, here are some pix of the outside of the house.

house 2017.03.26 - 1.jpg
roofers roofing
house 2017.03.26 - 4.jpg
ground guys digging
house 2017.03.26 - 3.jpg
back doors shining
house 2017.03.26 - 2.jpg
ready for downpipes
_house 2017.03.26-3.jpg
more roofers roofing… on a Saturday!

The problem with glazing bar alignment across the two planes of windows in the front bay that we had back in Week 42 has been resolved. Thank you to the Bronze company that agreed that this couldn’t be left as it was. It’s funny: now that the bars align, you kind of don’t see them any more. Good design kind of disappears.

_house 2017.03.26-8.jpg

Doors are on.

_house 2017.03.26-4.jpg
welcome
house 2017.03.26 - 8.jpg
…and the side door we’ll probably use more

This isn’t a standard box house, it’s very complicated. It’s also been through three sets of architects, two contractors, and lots of TLC and tweaks along the way. Like Terry designing the kick to the garage roof off the cuff with no plans. Some of the details only make themselves known when things are being fitted, so it’s helpful (not sure Tim and James think so..?) to be able to take time out and be onsite more and more as we race towards the finish line.

Case in point is the downpipes. There is one in the front labelled clearly on the drawing, and it goes right up in the corner between the vertical tiles and the huge two-storey beam. Well, having a drainpipe alongside the oak is a dippy idea as it’s front and centre and visible to god and everybody. But it wan’t not obvious until it was right there. A puzzle and much discussion: we can’t ditch the pipe because a LOT of rain will be flowing down that little section of gully. Water from the valley section and three faces of roof will be chucked down here right next to wood. But it dangling there alongside the wood and block its view was equally lacking. The solution that Spencer suggested as to add a few strategically placed special plastic vertical tiles that you can fix downpipes to on the opposite side of the gutter section, about three feet out from the gable and down the pillar to the east. That way you get your flow, and it’s away from the wood. A super plan on the first floor, but still not great on ground floor, because each downpipe is cut into the plinth at the bottom which is a gorgeous detail, and there isn’t one built in the new spot. I’m sure James will work something out……

_house 2017.03.26-2.jpg
looking up the beams and thinking about locating that downpipe

Architrave and mist coats are making the ground floor look more finished every day.

_house 2017.03.26-5.jpg
kitchen and family room
_house 2017.03.26-16.jpg
kitchen proper: the working area
_house 2017.03.26-6.jpg
drawing room
_house 2017.03.26-9.jpg
hallway looking north
_house 2017.03.26-10.jpg
hallway looking south
_house 2017.03.26-11.jpg
hallway looking up
_house 2017.03.26-14.jpg
quirky hallway upstairs
_house 2017.03.26-17.jpg
choosing colours again

house 2017.03.26 - 9.jpg

house 2017.03.26 - 10.jpg
khaki mist 3 or patters clay 2?

And ironmongery….? Luckily we’ve found the mecca of hinges and handles, and it’s in Fleet. We have dithered for weeks about finding a match for the bronze windows, much to the annoyance of Tim who simply wants to get the doors ON ferchrissake, but nothing was doing the job. Actually, there is a company in the States that does the job if you want to spend about £1k per doorset. Have not yet won the lottery so clearly not an option. So we’re going for black to match the balusters and to be a little non-controversial. Graham is helping us, and he’s immensely patient with our wavering and our questions.

house 2017.03.26 - 7.jpg
more choice than most

With all the flooring being laid shortly, James helped us in choosing the exact locations for the ground lights in the hallway and master bedroom. These are meant to light up the oak in a subtle way, but as we’ve not chosen the fittings yet, James left a suitable gap where they’ll go and concreted in around them. He didn’t waste any time: we were there with sections of pipework in the afternoon, and before they’d packed up, the lights were were packed out.

house 2017.03.26 - 6.jpg
light spot

With deadlines about colours, hinges, ironmongery, garden slabs, light fittings, driveway colours, and fireplace design passing us by, tempers are getting short. We are all working towards the same goal, even though it’s challenging to stay positive and keep all our pointy fingers from taking aim. When things like the long-awaited gas meter are put back as the installer drives away because the job was labelled for the gas board’s subcontractor as a Swap instead of an Installation (it WAS a swap, just a swap for a missing meter, remember?), it gets a little frustrating.

But then you’ll get one of those awesome spring days where everything is fresh and blue, and we’re reminded that everyone on this job is on message about quality, the finished result is gorgeous, and it doesn’t seem so bad.  Good weather and more cake… that’ll fix it.

house 2017.03.26 - 5.jpg
lovely

Week 49

house 2017.03.20 - 12.jpg
hooray!
DSC_0720.JPG
rewind…

What started as excitement seeing the marble arrive quickly turned into frustration at seeing 50% of the slabs chipped around the edges. They’ve all gone back to base which is a shame.

house 2017.03.20 - 13.jpg
gas trench

Lots of work done outside this week now that the scaffold is down. The gas installation requires three separate services: one to connect to the street, our guys to dig the trench, the same installation guys to return and connect, and the last bunch is the guys from the supplier to install the meter.

After spending an hour on the phone with the supplier trying to untangle the previous contractor’s paperwork, I discovered that they still had our gas “on” as “live”. This is weird because it’s been capped off for two years with a suitable daily standing charge applied. Hello, refund?! Once they got past that little idea, the next job was to line up their team to come out and swap the meter. This is great because upgrading to a smart meter at no charge is awesome, except… there was no old meter to collect. The previous meter has gone walkies, and the only way to proceed with the swap was to declare the old one “stolen”. You might think there a difference between lost and stolen, but not to the gas board. Their drop-down list only had stolen as a sub-option to missing, so I sheepishly called the police to get a crime number so I could report back to the gas people to complete their form. The short story and a very depleted phone later, is that the connection is due for Friday next week.

We’re having the electrics upgraded from single to three phase which will provide enough for growth if we ever decide to launch rockets from the garden or at least have power to a shed or an electric car quick-charger on the drive. This connection requires coordination between the power network installers who will do the work in a morning and the supplier who will install the meter in the same afternoon. The hidden subtext to this is that this has to be coordinated because while the sparks guys are onsite, the electricity is turned off in the street…. FOR THE WHOLE ROAD. So we’ll be popular then. Hopefully this will happen during Easter break when loads of people are away.

The downpipe drains have been dug out too, and they all lead to the soakaway in the back and the ditch in the front.

house 2017.03.20 - 10.jpg
downpipe trench

Terry and Josh are working hard on the garage to get it done before the roofers arrive next week. They’ll also need to finish scalloping the lead in the upstairs windows which they can now reach without the scaffold in the way. And they’ll finally tile hang the front of the house.

house 2017.03.20 - 1.jpg

house 2017.03.20 - 18.jpg

I’ll give you a little tour now that the plasterers are almost finished.

house 2017.03.20 - 11.jpg
kitchen pipework
house 2017.03.20 - 16.jpg
drawing room

house 2017.03.20 - 14.jpg

house 2017.03.20 - 17.jpg
hallway downstairs
house 2017.03.20 - 5.jpg
Nick’s painting will live on the white wall in the family room as seen from the kitchen
house 2017.03.20 - 4.jpg
view from the front entrance
house 2017.03.20 - 20.jpg
hallway upstairs
house 2017.03.20 - 2.jpg
quirky ceiling and skilling lines meet in the master bedroom and hallway

Clive has been applying the mist (under-) coat, and James has been putting up the architrave and skirting.

house 2017.03.20 - 23.jpg
mist coat, skirting and architrave
house 2017.03.20 - 3.jpg
lovely manifold in the linen cupboard
house 2017.03.20 - 19.jpg
lots of oak offcuts to play with
house 2017.03.20 - 6.jpg
bedroom

The last panel of plaster in the single-skinned flank of the upstairs gallery has been approved by the warranty company, so it’s ready for its mist coat too.

house 2017.03.20 - 24.jpg

house 2017.03.20 - 8.jpg
the panel that passed

This week was decision week: ironmongery, paint colours, stone for outside, stone for inside, fireplace, joinery. And I haven’t even started on the wardrobes yet. So, armed with an armful of colour charts, I went to buy some sample pots which Clive kindly offered to put up last thing on Friday. We quite like the Polish Pebble, even through it’s really Polished Pebble, but the guy at the shop mis-heard me so now it’s paint from the eastern bloc. I was picturing going to a decorator place, or B&Q at least, and choosing a nail-polish sized pot of paint to take home. But it doesn’t work like that. You need to choose a shop with a Dulux mixing machine where you tell them what colour you’re after, they type it into the machine, and it adds the exact amount of pigment to the base. I bit of a shake, and voila!, you’ve got your tester pot.

house 2017.03.20 - 28.jpg
list of samples

But the final colour can’t really be chosen without considering Nick’s painting. He’s the colour expert, and I’m very much not. The work isn’t not done yet, and won’t be for another month or so. So a quick visit down to rainy Rye to see him for a painting check-up, a cup of tea and a chat helped to narrow the field, and we’re pretty much there now on the ground floor. The pressure is on to make a good decision before we keep the decorators waiting and set the project back by dithering.

house 2017.03.20 - 15.jpg

I thought I’d take advantage of the journey that passed such amazing countryside, so I stopped at Leeds Castle to see if I could have a gawp and grab a sandwich on the return trip. I am so used to the National Trust that I just assumed I could grub and go easily. Maybe I’m just naive (well, definitely), but I was surprised to see that it cost just to go in. This clearly wasn’t the National Trust. Not even a coffee shop at the gate. I thought I’d treat myself and stump up for the entrance fee, but quickly put the brakes on when I could finally make out the charges on the board. What’s the maximum price you’d pay for just a peek at the castle where Henry VIII used as a residence for Catherine of Aragon before that all went south, a ham sandwich and a coffee? £5? £10? Well, the entrance fee is a whopping £24.50! Needless to say, my M&S wrap from the service station around the corner was smugly nice, and cheap.

Week 48

Goodbye scaffolding! It took three days to get all the gear down, and now we can see the whole building.

house 2017.03.11 - 11.jpg
scaffold neatly stacked and ready to depart

No scaffolding in the way means that Terry and Josh can get on with building the roof for the garage. This is a wiggly little beast that has had Terry brushing off his thinking cap to calculate the pitch of the flare. The flare determines the soffit width, and the soffit width determines the supporting post position, and all this is constrained by the location of the neighbour’s fence. And don’t forget the guttering…. Much hemming and hawing occurring this week, and even Dave was onsite to have a look and a ponder. In the end, we all reckoned the best way to build it was just to get on with it and see how it fell. So we all left Terry and Josh to it, and by the end of the week, they had a plan that matched the flare the same pitch as the rest of the house and he reckons the guttering will just kiss the border just like the old house used to.

house 2017.03.11 - 10.jpg
the first truss on the garage
house 2017.03.11 - 5.jpg
building the garage
house 2017.03.11 - 14.jpg
more trusses from the back of the house
house 2017.03.11 - 25.jpg
and even more from the front

Lee, Sean and the groundworks team have been back with their digger to make the rainwater drains meet up to the soak-away in the garden. There are six downpipes at the back of the house that all run to the inspection port. It was a little odd to see the this thing poking its head up above lawn-level, but the plan is to cut it down to as low as it can go, and if we ever need to rod the downpipes we’ll have to find it and dig it out to get access. This is ok with me. I regularly used Douglas’ old set of rods to sort the drains in the old house, so a bit of potential digging on the off-chance that these need sorting isn’t going kill anyone.

house 2017.03.11 - 12.jpg
inspection port
house 2017.03.11 - 24.jpg
groundworks return
house 2017.03.11 - 1.jpg
nimble digger
house 2017.03.11 - 6.jpg
garden massacre but the camellia is undeterred

Now that we’ve sorted the design on the fireplace and have signed off on the plans, it’s down to the guys to build it. But there are still a number of trades to coordinate: stone, joinery, fireplace, general building, electrics. There is a lot to this piece. I had my first foray into sourcing stone this week having gone to the stone yard to have a look at some off-cuts. I hope the inside does justice to the outside.

house 2017.03.11 - 2.jpg
lots of stone
house 2017.03.11 - 8.jpg
chimney symmetry

It’s always a challenge to walk around site and to visualise what it will look like when finished. It’s hard to resist taking photos of general stuff going on, but equally hard to figure out where the best vantage will be for the “before” or “during” snap to compare to the finished “after” one.

house 2017.03.11 - 13.jpg
during?

Nicola’s design is being finalised, but here is a quick working-drawing teaser.

house 2017.03.11 - 4.jpg

The plasterers work hard when they’re onsite–we just need a final push to get it done and then the architrave and skirting can go up. In preparation for that day, Clive is staying out of their way and has got a great system set up in the master bedroom for the task of painting miles and miles of wood.

house 2017.03.11 - 15.jpg
family room ceiling — tick
house 2017.03.11 - 16.jpg
kitchen with plasterers’ platform
house 2017.03.11 - 17.jpg
living room with tray ceiling and bags of plaster
house 2017.03.11 - 18.jpg
ground floor ceiling protrudes until the landing apron is installed
house 2017.03.11 - 19.jpg
Osmo-ed architrave
house 2017.03.11 - 21.jpg
relief grooves in the backs of the tall oak skirting
house 2017.03.11 - 22.jpg
Clive loves his Osmo

We’ve come up against a stumbling block with shower trays. The current ones we’ve chosen are expensive, and two don’t fit. One of the wells made for them to drop into is slightly too small and we’d like to see if we can grow it. This shouldn’t be too much of an issue, until you take into account the underfloor heating. Risking making a hole in the pipes set in concrete to chip out the necessary extra 100 mm would be catastrophic at this point. So we’re trying to figure out other alternatives, one of which might be a wet room type of thing. Tim can’t start tiling until the trays are down so we’ve got to get our skates on to sort this out or the whole programme will suffer and we’ll push everything back weeks. The jury is still out while we research other options, so in the mean time, here is a photo of the shower in the girls’ bathroom.

house 2017.03.11 - 23.jpg
where’s the waste, Wally?

You would think that choosing colours would be the fun but, and it is. But agreeing on colours is another matter. And nudging the kids to make decisions about their rooms is proving a challenge too. Tim says to paint the whole thing white and wait with colour until the rectification period is over and the inevitable cracks are plastered over. This makes a LOT of sense, but it is so tempting to just paint it its final colours and get it done. With our usual speed of making decisions on this project, it may be after the warranty period before we finally decide, so Tim just might get his way after all. And by then, Tim will be sailing off into the sunset, drink in hand, remembering fondly the lovely job he did at St Anne’s and it being ancient history!

house 2017.03.11 - 9.jpg
tableau of indecision
house 2017.03.11 - 3.jpg
Josh needs a new pair of boots

house 2017.03.11 - 7.jpg

Week 47

We have a flue!

house 2017.03.05 - 1.jpg
no jolly men in red suits today

Actually, it’s a flue liner, not to be confused with the identically named but made of pumice ‘flue liner’ that was already installed with the chimney went up. All very technical, but for the past few weeks, Dave has been developing the plans to make this thing work.

Screen Shot 2017-02-28 at 15.57.22.png
These are the best laid ones of the bunch…
house 2017.03.05 - 2.jpg
installing the cowel at the top
house 2017.03.05 - 6.jpg
all set to go

Terry and Josh have made a start on the garage roof. This first requires brackets to be attached to the wall on one side and onto the brickwork on the other. They were making good headway until they got called to build a new skin to a wall in the hallway later in the week.The problem was a very small area of single skin which was going to make the place thermally inefficient and vulnerable. This issue had been brewing for a while as we’d been waiting for approval from the warranty company with this wall design and with a little pushing from Ben, they finally approved the thinnest version which is great because it allows more of the oak frame to be exposed. But it’s a problem no longer, as the thing is now built at long last, and the plasterers can get on and finish it off.

house 2017.03.05 - 1 (1).jpg
Terry’s garage roof brackets
house 2017.03.05 - 17.jpg
thicker wall

Aaron’s been in to finish the first fix wiring. The wires have been capped and cased all over the house, and they’re making maps of were they are under the plaster so we don’t end up sticking nails through them when we put up artwork.

house 2017.03.05 - 3.jpg
breaking a few eggs before the omelette is finished

Once Aaron was done, there was a whole gang of new plasterers that came and put the ceilings up. It’s very high tech with laser sights and grids of brackets to hold up the suspended ceiling that hides the electrics and plumbing under the concrete upstairs floor. They’ll still be about 2.8 m off the deck.

house 2017.03.05 - 4.jpg
straight line gizmo

One last trip around the scaffold to check out the finished roof.

house 2017.03.05 - 5.jpg
can’t resist taking another of these pix
house 2017.03.05 - 11.jpg
cloaking tiles
house 2017.03.05 - 10.jpg
a mortar snake through a hole in the slate (these just flick off)

house 2017.03.05 - 7.jpg

house 2017.03.05 - 8.jpg
lead dormer cheeks
house 2017.03.05 - 9.jpg
pencil lines showing the handmade workmanship

The doors arrived at long last. It took four guys to lift them off the truck, and they came pre-assembled in their frames. James, Terry and Josh will fit them next week which will make the building will be almost air tight. This will not be a small undertaking. As you can see, we have yet to choose a doorknob in the centre. Clinton actually bought a brass casting kit a couple of years ago, and we’ve got some thoughts, but it’s got to be good. No pressure!

house 2017.03.05 - 12.jpg
colossal front door (it’s upsidedown)

The plasterers are just about done upstairs and will move downstairs next week. Like the rest of the house, it’s not been straightforward: there are some fiddly bits like in the upstairs hallway and some enormous swathes like the stairs wall and the whole of our bedroom. They’ve done a great job, but they’ve got to get a wriggle on to finish downstairs before the floor goes down.

house2018.03.05-4.jpg
master ceiling
house2018.03.05-5.jpg
plaster in the master bedroom
house2018.03.05-8.jpg
hallway looking east


house 2017.03.05 - 16.jpg
hallway looking west
house2018.03.05-9.jpg
stairs area
house 2017.03.05 - 14.jpg
lunch pail

And then the scaffolding came down….

house2018.03.05-1.jpg

house2018.03.05-2.jpg

house2018.03.05-3.jpg

house2018.03.05-7.jpg

house2018.03.05-6.jpg
a good before picture of the knot garden


Week 46

Most of the action this week occurred behind the scenes. Lots of planning and sorting and choosing more than cutting, sticking and building. We’ve chosen a fireplace, paid bills, decided on tiles, placed thermostats, chased electrics, considered ironmongery and built-in furniture, and we started thinking about wardrobe build-ups, kitchen pendants, sofas and curtains. I thought we were doing well with box-ticking until Tim asked for confirmation of colour choice for the paintwork. I think I need a lie-down….

Spencer is pretty much done with the roof, and now he and Jackson are on to the more decorative bits. One of these is the scalloped lead-work around the windows. There are 16 downstairs and 10 upstairs runs of this lead, all of varying length. There is nothing at all normal or even and symmetrical about this house. The lead was installed when the oak subframes were put in. It serves a very useful function in keeping the brickwork section underneath waterproof, but it’s an artisanal job to make it look pretty.

It starts with a scored out scallop.

house2017.02.24 - 4.jpg
a satisfying OCD moment
house2017.02.24 - 3.jpg
Jackson and his compass

Then the scallops are cut with actual scissors to make the shapes.

house2017.02.24 - 5.jpg
Spencer practicing his cutting out skills

Each cut-out is rolled up and hammered into place.

house2017.02.24 - 7.jpg

house2017.02.24 - 6.jpg The guys wear gloves because of the chemicals in the lead. Working with this stuff all day is toxic–lead poisoning is a real thing, and the preservatives on the surface are well-yucky.

house2017.02.24 - 1 (1).jpg
ooooo…
house2017.02.24 - 2 (1).jpg
…ahhhh

We’ve opted to keep a layer of PVC on the course between the plinth and the vertical brickwork to protect the plinth from stuff dropping on it from above. All it takes is a stanley knife to remove it later on.

Plastering is the name of the game in other areas of the house. And in the few rooms where they are not working, Terry and Josh can get on with the window boards. Must say, they look lovely next to the subframes. They’re both treated with this Osmo oil which will bed in and soften in colour over time. We’re putting the stuff everywhere on all the oak except the huge structural pieces–architrave, door linings, the lot. We’ll even slap it on the oak underside of the first floor overhang outside. James hates it only slightly less than the black stain on the soffit boards.

house2017.02.24 - 1.jpg
window board

Another interesting piece is the brick inlay panels. They’re not herringbone, but everyone calls them The Herringbone Panels–even us. Actually, with my Pedant Hat on, they’re Askew. But this is alright with me! (Sorry). Clive painstakingly sliced each brick to a skinny sort of depth, and we’ve bought this fancy adhesive for them to stick them on. Like the oak cladding last week, this is not quite functional, well, not at all, but it looks awesome. They’re doing a brilliant job setting, pinning, gluing, and mortaring them into place.

house2017.02.24 - 8.jpg

house2017.02.24 - 9.jpg

house2017.02.24 - 10.jpg

There are fifteen panels to make: 5 across each apex front and back, 5 across each paired square below them, and 5 below the windows in the hallway. That’s a lot of work, and I feel somewhat guilty just writing this in all the time they’re spending making the panels, but they are taking enormous pride in how it’s turning out. They took a day off the scaffolding when storm Doris blew through, the front and some of the back are mostly done.

I don’t usually go on about it, but I take great pride in looking at other houses with this similar non-herringbone brickwork, whose designers have decided to use a different brick from the rest of the house because it can be bought in, and thinking that our guys have simply taken the time and made the effort to do a brilliant job. Anyone with eyes can see that it’s a total pain to have spent days and days cutting these really thin slices to carefully stick on the boards, which is what James and the guys have done. But the finished effect will be seamless with the brickwork in the rest of the house because it’s exactly the same brick. It’s a bespoke house that everyone  onsite is on board with to make it as good as it possible can be. And THAT is the bit that’s amazing.

house202.24 - 2.jpg
lonely roof while Doris blows through

Week 45

Early birds, these guys. On my way to meet the electrician at a lazy 7:30 am, I saw that they’d already had a delivery that was just departing down the lane.

house2017.02.18 - 1 (3).jpg

2017.02.18-1.jpg
oak cladding in morning light

More oak arrived late yesterday via Neil and his Land Rover with trailer; it’s always a pleasure to have him onsite. These pieces will cover the steels in the master bedroom, a design compromise that sits a little uncomfortably only because for the rest of the house, the wood is structural, and this isn’t. But with Neil’s skill in fabricating, and Josh, Terry and James’ skill in installing, I doubt we’ll be able to tell any difference between the cladding and the real deal at all in years to come. It looks very fresh at the moment when put up next to the stuff that’s been up for six months. Neil clearly spent ages on the comprehensive installation manual for the guys too. I’m sure they’re grateful!

house2017.02.18 - 1 (4).jpg
instruction manual
2017.02.18-2.jpg
Terry’s not putting it up on the wonk, it’s the lens distorting the angles
house2017.02.18 - 8.jpg
curved beam to match detail in the hallway

Meanwhile, work carries on around the rest of the house, and it’s crowded. Plasterers, roofers and electricians have been in all week, and I’ve been interviewing fireplace experts, interior designers and joiners.

house2017.02.18 - 10.jpg
fitting plasterboard from the vaulted section

The best bit of the week was our topping out ceremony. We, well, Tim really, decided it would happen when the last ridge tile went on. Originating in Scandinavia, this is an event that usually happens on bigger projects and usually involves chasing out evil spirits with branches of evergreen plants, and blessing the building for its future occupants in some way. Rather than inviting a random druid priest around or sticking the odd sprig of fir tree up the top of the scaffolding, we tried to keep it simple.

Our solution was that we signed the final ridge tile.  We got out our white pen and scribbled as a family, then got Tim, Ben, James, Terry, Josh, and Spencer to sign as well. So Spencer carefully left the last space empty for us to fit on the very front of the house. Excellent! It was a two-part event with fizz and sausage rolls on the Thursday as Clinton couldn’t be there for the actual fitting on the Friday. Everyone from the roofers to the tackers were there. Matt, Gillian’s boyfriend even joined in. Clinton said a few words of thanks, we armed Tim with the camera for some family snaps, and then we tucked right in!

house2017.02.18 - 9.jpg
Gemma setting up the buffet
house2017.02.18 - 11.jpg
builders buffet
house2017.02.18 - 12.jpg
it IS Oxshott after all
house2017.02.18 - 13.jpg
thanks, guys…
2017.02.18-3.jpg
… from all of us
2017.02.18-4.jpg
underside of the ridge tile
house2017.02.18 - 14.jpg
future residents
2017.02.18-5.jpg
Gemma and fake fizz


2017.02.18-6.jpg

2017.02.18-7.jpg
we even had waiting service

2017.02.18-8.jpg

2017.02.18-9.jpg
The A-Team: Ben, Jackson, Tim, Clive, Blake, Dave, Mike, Josh, Terry, James, and Spencer

So it seemed only fitting that after all these festivities and thank-yous that we actually got the signed tile on the roof.  The girls, Matt, and I spent a lovely sunny morning in Roofing School with Spencer (well, me watching them more than doing anything constructive).

house2017.02.18 - 1.jpg
up on the scaffold


house2017.02.18 - 2.jpg
Spencer prepares the area for the final tile
house2017.02.18 - 1 (1).jpg
Gemma lays the tile

Can’t say that our efforts contributed anything special, but it will be lovely to think that at least we had something tangible to do with the build as we look up at the front gable forevermore. The layers of cloaking look great, and the rest of the roof is just about there. Next week will involve Spencer doing a little tidying with other, lower, ridges, which leaves the scaffolding coming down Thursday or Friday!


house2017.02.18 - 3.jpg
final tile in place
house2017.02.18 - 4.jpg
cloaking closeup
house2017.02.18 - 5.jpg
“How are we going to get the leaves off THAT, Mum?”
house2017.02.18 - 6.jpg
can you spot the venting tiles?

house2017.02.18 - 1 (2).jpg

house2017.02.18 - 7.jpg
roofing signature


Week 44


house2017.02.11 - 22.jpg
James and Spencer discussing the roof

The roof is almost finished. Spencer asked me if I was happy with the course of cloaking tiles that will sit between the oak gables below and the roof tiles above. He’s added a layer of Welsh slate secured underneath to prevent the roof from wobbling as the oak settles. They’ll be mortared in when they’re laid next week, and the gap between them and the roof tiles will be filled as well. The carefully installed leadwork finishes the job.

house2017.02.11 - 18.jpg
junction of tiles, slate, cloaking, and lead
house2017.02.11 - 19.jpg
cloaking mockup that will go up and up
house2017.02.11 - 20.jpg
leadwork
house2017.02.11 - 21.jpg
clothed and unclothed

The gutters went up later in the week. They’re powder coated aluminium which will last and last with any luck. Aluminium is made in longer lengths than cast iron which is great for the long runs without dormers–easier to make, easier to coat, and easier to install. Although the guy I spoke to who was working with long sections of it up on the scaffold late on Friday said it was very very cold as a material to handle. Yes, at 2C it would be. They’ve installed around all the fiddly dormers, and the downpipes will go in when the scaffolding is down. In the meantime, they attach giant bags to where the downpipes should be, so that water still collects and stays off the face of the building until the job is complete.

house2017.02.11 - 9.jpg
dormers with burlap hats on
house2017.02.11 - 10.jpg
long runs of guttering on the east side
house2017.02.11 - 11.jpg
pieces cut to length and ready for fitting


house2017.02.11 - 12.jpg

house2017.02.11 - 13.jpg
guttering installed just in time–this is slushy snow in standstill traffic…lovely!

It’s the middle of a bitter cold spell with snow off and on all week, but none of it sticking, so it’s just disgusting outside with no snow-joy. Phil the plasterer says that they need it to be 5 degrees and rising for plaster to set. Part of their job is to physically stand there and watch it set to even out imperfections, so this is taking rather a while, more like days than hours, it being all in cold and slo-mo.

There are ten individual 2.5 m tall panes of glass in the hallway at the front of the house. If we do decide to go with the fancy automated curtains we’ve got in mind, we’ll need holes drilled and wires for power setup through them. James had the unenviable task of drilling the structural oak as close as he could to the windows given the body of the drill. So faced with this tricky job of messing around with the expensive and carefully engineered oak, he simply bought a new drill bit for the job, lined it up, and with his typical levels of cool, just got on with it. It looks bizarre to see shavings of precious structural oak now adorning the surfaces of the lower beams. I’m glad I wasn’t there to watch.

house2017.02.11 - 15.jpg

house2017.02.11 - 16.jpg
cable hole

The back of the house is looking more like a house. Terry is still up the top, round the sides, inside, outside, and up and down ladders all day long cutting bits to go just about everywhere. Meanwhile, Josh is in full voice doing the same. There is more than enough to keep both of them very busy and loads of disco tunes to keep them going.

house2017.02.11 - 2.jpg
back of the house

We welcome Nicola on board this week. She’s the garden design expert and will draw up a plan for the front and the back. This is timely because I had the good fortune to meet James the landscape gardener and Andy with the driveway materials, both to discuss what’s happening outside. So a plan is where we want to start, especially with the hard landscaping and tree-planting as there is a certain level of commitment involved in those pieces, and that will come to fruition in the coming weeks. For once we’re doing something in the important-and-NOT-urgent-box, and not in our usual space of important-and-urgent.

Meanwhile, what colour of driveway would you like? The most cost-effective range is the 6mm aggregate which requires a 16mm base rather than the 10mm aggregate which requires a 22 mm base. Less material means less labour as well as less of the stuff in the first place which equates to less money (hopefully).

house2017.02.11 - 1.jpg
10 mm is too big, 3 mm is to small, so 6 mm is just about right

Another visit to the forge to end the week to have a discussion with Tony about some very minor tweaks to the curlicues.

house2017.02.11 - 3.jpg
look closely for snowflakes falling in Betchworth

house2017.02.11 - 4.jpg

We had a good chat about his current job, how he started his career and what happened to allow him to start working in a place like this 27 years ago. I think he is enjoying working on our project as he seems to be a specialist in odd and interesting metalwork staircases. We’ll go back another time when the fire is on and he’s making our pieces.

house2017.02.11 - 5.jpg
the anvil has seen many years of action
house2017.02.11 - 6.jpg
Tony and Clinton discussing the ups and downs pattern

James is preparing to fill in the brick slip panels soon. He’s given one of them a start, but the specialist epoxy mortar we chose back in Week 31  needs a special gun for application rather than a trowel, so he’s waiting on its delivery before continuing. There is leadwork to fill in beforehand anyway. Meanwhile, Clive has been cutting bricks like there’s no tomorrow.

house2017.02.11 - 8.jpg
Clive’s been cutting bricks and tiles

I hope the view through the building will always be this good. Maybe if it’s good now with bags of plaster, ladders, and light fittings hanging off the ceiling, it will be even better when it’s all tricked out with furniture when you come down to make a cup of tea in the morning.

house2017.02.11 - 23.jpg


Week 43


The roof is almost completely done. The colour is great, the guys are working hard–even on a Sunday, and the leadwork is gorgeous. The guys tell me there are loads of cuts which is slowing progress at this stage. You can hear them cutting from across the train tracks into the woods as we walk up to site. Most of the cut tiles are fitted all around the fiddly dormers that were built, needed a redesign from Dave, unbuilt, rebuilt, and now leaded and tiled. Loads of effort but they really make the building.

house2017.02.03 - 4.jpg
leadwork over oak and under the tiles
house2017.02.03 - 5.jpg
fiddly

Tony has been busy experimenting with the curlicues on the balusters. He works out a listed building that has always been a forge since it was built in the 1400s , and he’s working in tandem with our joinery company that I visited back in Week 24. The joinery company works in the complete opposite way with a spotless factory full to the brim with machination, lasers and CNCs. You couldn’t get a pair of trades working more differently. And they’re both getting on famously! It would be nice to think that we’ve started a symbiotic relationship in stairmaking here.

house2017.02.03 - 7.jpg
Gregory visiting the forge with me
house2017.02.03 - 6.jpg
CAD drawings to scale for Tony to work with (that’s our lamp in the back all restored too)
house2017.02.03 - 8.jpg
ta-da!

The stair design is super complicated with three types of balusters, intricate oak interim newel posts, and all the other bits of the stairs like treads, goings, aprons, strings and nosings. It’s an artform. One of our decisions to make was about the thickness of the upstairs flooring: 15 mm or 20 mm? This had a massive implication for the staircase which has a 10-week leadtime. 5 mm! But it has a big effect on stairs. It was a job for Ben to coordinate all these overlapping decisions in the correct order so everything arrives on time. Not inconsequential, and I’m glad I’m not doing it (I couldn’t).

So I’ve had my sharpies out to ensure that everyone knows exactly where each type of item is going. This might sound pedantic, but it’s not a simple task to create this masterpiece when its taking two manufacturers, Ben to coordinate, Tim to purchase, and James onsite to make the whole thing work.  Ultimately it will be a really special part of the house.

Another Big Thing going in is the bronze double doors to the back bay. They look great now, but I know that when the glass goes in and the lead lines don’t match, I’m going to really have to work on my non-cringe attitude towards it. But, …. it’s the way it is, it’s in the drawings, and we’re leaving it. But before all that happens, we’ve got to protect the casements, so the doors are drilled and fitted, and then they’re tucked away in the garage for safekeeping until the rest of the building is watertight or at least until the wet trades are out of the building. Access will be an issue too when these go in because we don’t want the whole of everyone to be opening and closing them all day long, nor do we want to have them propped open and potentially bashed into accidentally.

There are masses of guys onsite every day now, and parking is becoming an issue down our tiny little lane. Most of the neighbours have been super patient and we’re grateful for that. It’s only temporary! James even got his shears out to cut back some of the overgrown (we haven’t lived in the house for almost two years now so no-one has been around to do this) shrubbery across the way so that cars can pass more easily.

house2017.02.03 - 9.jpg
liability?

We’ve had MANY meetings about electrics. But a single team will be onsite now to finish the first fix. In hindsight, we should have been much more proactive in wiring this house from the start. We should have got sorted with lamps, circuits, control and all permutations of data and TV sockets that are going in, right down to the smoke alarms long before we put spade to earth.

One of the questions Paul asked today was what height do you want the doorbell? Well, what height SHOULD you put a doorbell? It was all down to Clinton pointing his finger at Paul’s shoulder through an imaginary doorbell and saying, “Here.” So the guys got their drill out and put it through the building at Paul’s shoulder-height. Effective, but bonkers.

house2017.02.03 - 10.jpg
electrical pow-wow
2017.02.03-8.jpg
wiring for the study
2017.02.03-11.jpg
“Where do you want your outside lights, Madam?”  “Er,…. ?”
2017.02.03-9.jpg
cloaks closet / IT hub

The screed for the front floor was laid on Friday to set over the weekend. The guys moved the ladder to the other side so we all avoid the area until it’s rock-solid.

2017.02.03-1.jpg
screed
2017.02.03-6.jpg
hi-tech job this screed laying


Meanwhile the plasterers are in the bedrooms making them look like, well, rooms. They covered up the windows with masses of really thick black tape and card to protect them. This is all well and good, but the house is now completely dark. They’ve brought in masses of lights to help, and these are good because they highlight every imperfection. Clearly, there aren’t many imperfections when they’re done. They’re a totally jolly team which is amazing considering it’s totally hard and messy work. They’ll be in over the weekend (which is awesome) so that it goes off in time for Monday and all the chaos that ensues for next week.

2017.02.03-2.jpg
electrical cutouts
2017.02.03-3.jpg
portable lighting
2017.02.03-5.jpg
blackout
2017.02.03-4.jpg
a LOT going on this week
house2017.02.03 - 3.jpg
all packed up after plastering

It’s lovely to just walk around and see what’s changed from day to day–even down to where they put stuff. I think that we’ll be using the house in much the same way as they do; they’re putting their gear out of high traffic areas, just like we’ll be doing when we move in. I’m taking notes….

2017.02.03-7.jpg
OK so maybe we won’t store off-cuts in the master bedroom…
2017.02.03-10.jpg
tableau of M&E and insulation in the kitchen
2017.02.03-13.jpg
Dizzy has been onsite from the beginning and is now residing in the kitchen